By: Jennifer Duff
Capital Cooking Contributor
So, let me just preface this by saying, I am not a great baker. I love to eat sweets, cakes and a great deal of chocolate. But, I generally stay away from baking for two reasons -- it is too precise (I refuse to "level with a knife") and it tends to be lengthy and intricate. I guess it comes down to the fact that I don't have the patience for it.
Despite my anti-baking perceptions, I had the opportunity to review The Art of Cake Pops, a cookbook showcasing various designs and flavors for cake pops, and decided to give it a go thinking, "if I could do this, anyone can."
So, a word of warning that took me a few reads of the intro chapters to figure out... cake pop making is a three day exercise that requires a bit of equipment and materials. You need to plan accordingly.
Day 1: Bake the Cake
The cookbook discusses making your own cake from scratch versus making box mix and how that affects the consistency and texture of your cake balls. I thought about making a cake from scratch for a millisecond. And then went to the store and bought a box of cake mix. Much easier. Since it was a box cake mix, it needed to sit out for a day to "dry out" to be able to add the binder on Day 2.
Day 2: Cake Balls
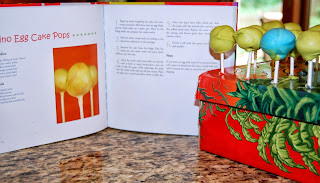
The cookbook offers 25 designs of different cake pops in a variety of themes like "Garden" and "Baby Shower." I dug deep through the book to find what would be the simpliest cake pop to make. I landed on Dino Egg Cake Pops - they were round and one color. Sold.
The cookbook walks you through the step-by-step process of breaking down your cake into a sand-like texture, making icing, blending it with the cake and making cake balls. It sort of reminded me of taking a cake, mashing it up and rolling it into a ball, except with using fancy kitchen equipment.
The instructions called for an electronic scale to weigh 1 oz cake balls. Ummm... No. Way too much precision for me, you'll get the ball I make. And then the balls go in the fridge to chill and solidify overnight.
At this point, you as the baker should rest. You'll need your energy for Day 3.
Day 3: Melting, Drying and FINALLY, A Cake Pop
More is needed to finish these little dough balls into the cake pops they yearn to be. A trip to a craft store will yield items like lollipop sticks and candy melts (and any crazy materials like a paintbrush that the design requires). You stick the lollipop in the candy melt and set it in the ball so it holds the pop.
Then you dip the balls into the candy melt to cover, stick in a stand to dry (I made a stand from a shoe box and put holes in it with a wine opener - take that MacGyver!), and viola! I think my cake pops required some petal dust and luster dust to finish, but I wasn't planning to sell them at a bake sale so green and blue would do just fine.
A few of my pops cracked, or took off in the candy melt, but for the most part, they held together really well. And I have to admit they were absolutely delicious. They looked nothing like the original design, but well, whatever.
So, in the end, if you are a candy maker, or like to create desserts that are eye-catching and clever, this cookbook is for you! It definitely has cute designs and a variety of different flavors and ideas for creating cake pops.
And, if you are like me, and you don't want to invest 3 days of time and energy into a dessert, well, visit your local bakery, I'm sure they can help you out! Happy baking!


No comments:
Post a Comment